Thursday, 31 October 2013

Ferrero Rocher Flower

Here is a quick way to make thank yous or place settings using individual Ferrero Rocher's.
I die cut large flowers, distressed and curled them to give a better shape. Next I layered  the flowers together to form one large flower and attached the chocolate with a glue dot to form the flower centre.

 These would be lovely as place settings with each persons name on a leaf or given as thank yous instead of cards.

Saturday, 26 October 2013

Bird House


 I have had this bird house for so long, I knew what I wanted to do with it but just never got round to doing it!!! Then a good friend told me she was moving and bingo, this house was decorated just like that!! She will love it as a new home gift.
 The house started off as bare wood, I inked every edge with Walnut Stain Distress Ink, then started to add the paper
I used a hot glue gun to attach the ribbon to the roof top.
 I inked round the paper edges too before I glued them to the house.
 The roof is made of scrap card and paper I had which I put through my scallop edge punch, then layered up to like roof tiles.
The bird on the front is punched out in white card, using a stampin up punch that I managed to borrow, then I inked the bird in  colours to match his house.
The finishing touched were glitter glue and glossy accents.


Tuesday, 22 October 2013

TMNT Card (no. 2)

This is a picture of the second card I made for Adam, again the Turtle is made by piecing paper/card together.
Raphael is Adam's favourite Turtle but he told me off because Raphael does not say 'cowabunga' my answer to that was but he just grunts and you cannot have 'grunnnnnt' on a birthday card!!!

I know Adam was pleased with his cards, he took photo's on his phone and sent them to his work colleagues, the average age of them is 25 years old, they thought Adam's card was 'sick'!!!

Friday, 18 October 2013

TMNT Card

My son Adam is still mad about TMNT, he's 17 years old!! but they must be the Turtles he used to watch when he was little.
This is one of the cards I made for his birthday, I made two because I could, but also I wasn't sure which one I liked best.
The card is made by piecing card together to make the picture.
  The happy birthday background is a large stamp I have had forever.
 As the card I made was of the Turtles on a pizza I then decided to make a pizza box to put one of his gifts in. The image on the box is one I printed out from google, what would we do without it?

Tuesday, 15 October 2013

Wedding Card

My oldest (don't tell her I said oldest) and dearest friend recently remarried, this is the card I made for her and her new husband.
The card is made from Basic Grey papers that I had in a kit, so for me to use my precious Basic Grey papers she must be a very special friend.

 My friend was really pleased with her card, she has framed it and put it on her bedroom wall

 Below is the folding box card I made to put in the wedding gift which was vouchers, they fitted a treat and it looked so much better than just putting the vouchers in an envelope!!


Friday, 11 October 2013

Malteaser Cheesecake

My favourite chocolates are malteasers, I can eat packets of them and they are lush in hot chocolate.
So when I found a boxful in the cupboard I decided to make something different, I googled malteasers and so many yummy things came up it was hard to know what to do, but as my family love cheesecake that's what I went with.
This time I made mini cheesecakes, usually I make one big cheesecake, but these were easier for my lot to put in their lunch boxes.
The Malteaser Cheesecake was a great success, so much so, my boy's friends came round for some, and then some more!!!

Tuesday, 8 October 2013

Tithe Barn Class

This is the card we will be making at Tithe Barn on Saturday, I designed this one so that the tree die we all loved last year can be used again.
If you would like to book a place in the class please contact Karen at craftbuddies.

Sunday, 6 October 2013

Halloween Goody Bags

When Lucy and I visited our local old fashioned sweet shop I spotted these Orange and Cola Millions.
I knew they would look fab in the long thin cello bags I have.
 For the toppers I used stamps from a Stampin Up hostess gift, I just love the spiders web, unfortunately I still cannot find my other spider web stamp... oh well it will probably turn up in time for valentines!!!
 Here is a recap of all things Halloweeny for this year.


Saturday, 5 October 2013

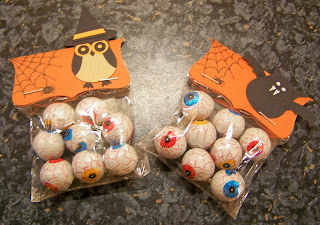
Bags of Eyeballs

I found these chocolate eyeballs in my local supermarket.
I used mini cello bags to put them in, die cut a top note square which I then folded in half and added a hand drawn spiders web, I couldn't find my stamp!!!
Again I have added two toppers made from Stampin Up's owl punch.

I think they look really good altogether.


Thursday, 3 October 2013

Witches Broomsticks

How cool are these doody witches broomsticks?
To make them all you need is a lollipop and brown card.
Cover the lolly stick with darker brown card. cut a fringe in Kraft card, leaving about 1/2" uncut, this is where it is attached to the broom handle, for my mini lollies the kraft card was 1 1/2" x 4".
Full instructions can be found at www.splitcaoststampers
I already had the owl and bat toppers, they are made from Stampin Up's owl punch, when I first got it a long long while ago I went a bit mad and made lots of different things from it, check out google images for inspiration.
 Sorry about the dire photo, something is up with my camera, but I can't work out what, sometimes it works fine sometimes it doesn't!!!
 On this photo you can see the lollipop better.
I can't wait to hand these out for Halloween...